


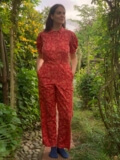
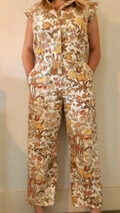
Sloan — Fitted Jumpsuit Sewing Pattern (PDF)
Description:
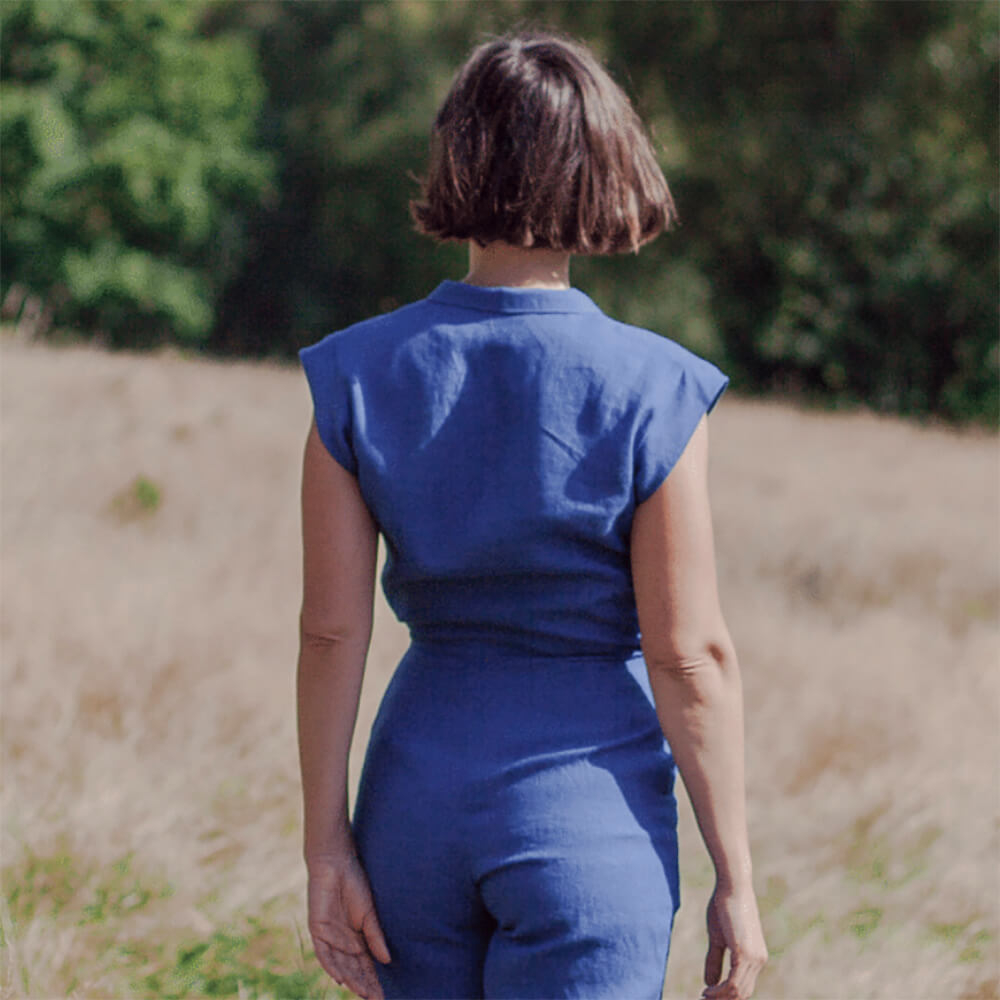
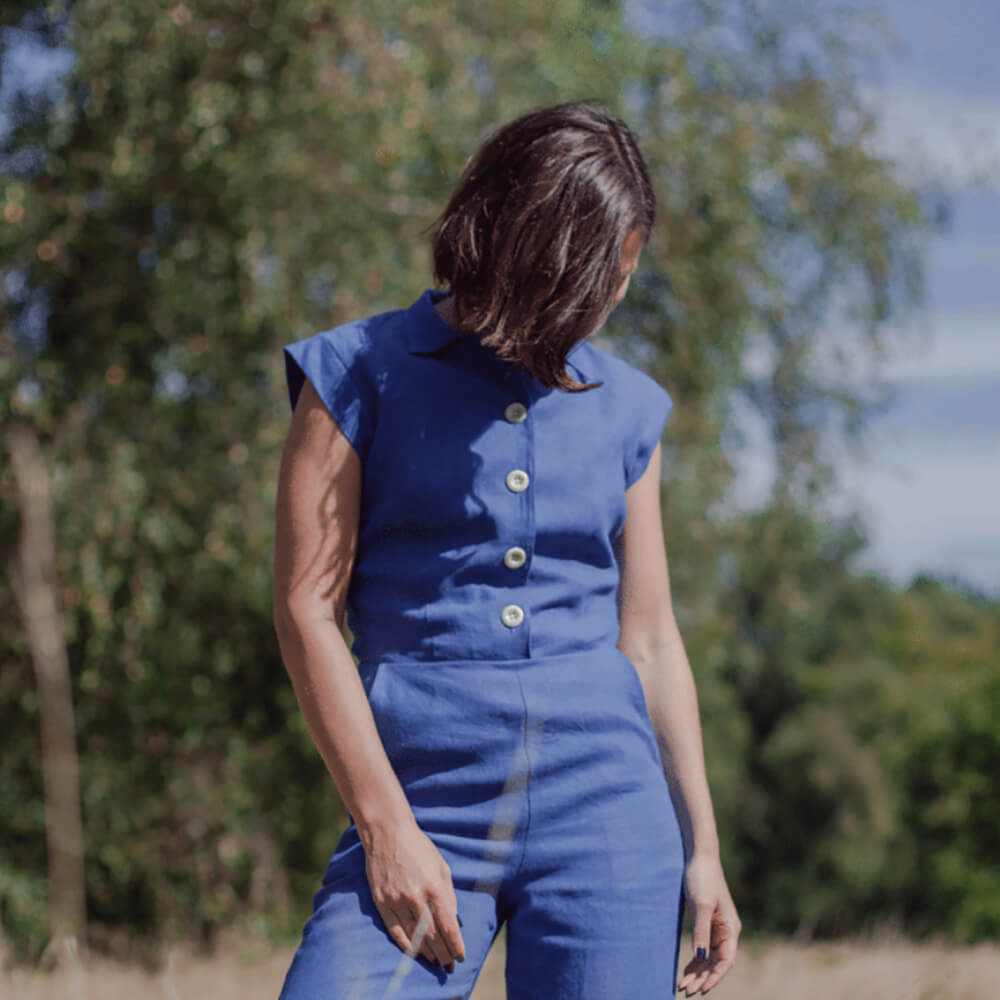
Want to take the style factor up another notch from just your average jumpsuit? Try our newest Sloan jumpsuit sewing pattern! Fitted throughout the body, it hugs your curves at all the right places. Slightly cropped legs, zipper closure, contrasting buttons, cuffed sleeves, and convertible collar are just a few details that make this style both chic and functional.
The Sloan jumpsuit is the perfect all-in-one outfit with all the ease of a dress, just that much cooler! But the real beauty of this pattern is its versatility wear it with trainers or heels, all year long, from day to night.
Product Specifications:
| Type: | PDF Pattern |
| Skill Level: | Beginner |
| Design Variations: | 1 |
| Sizes: | 0/2 to 12/14, 16/18 to 28/30 |
| Illustrations: | Yes |
| Instructions: | Yes |


Customer Questions and Answers
Don't you have free patterns anymore? Do you plan to put this pattern for free again? :(
 F|S Team
We had a promotions for free patterns , but this offer is not available any more.

I used just the top portion of this pattern because I really liked the look of it. Sizing was pretty accurate. I found it a bit too small in the waist so I just made the front darts smaller. If I use this pattern in the future I will definitely make the facings wider since you can see the raw edges of them when I wear it with more than one button open.
Really impressed with this pattern. I had no trouble following and sizing was pretty accurate. I found the torso a wee bit long so shoryen d the bodice..but other than that, the small fit great. So impressed with your photo and video tutorials, it makes tackling new challenges just a bit less intimidating (which I fully appreciate).
A beautiful pattern, thank you so much to all the team! I made it with an old bedsheet and I'm super happy with it. I made a little short about it: youtube.com/shorts/4oxpf6wBZPI Here are a few of my tips/notes: - I self-drafted my own pleated sleeves instead of using the pattern's sleeve bands: I drew a simple sleeve pattern, then cut and spread it to create one box pleat in the center and two knife pleats on either side (depth: 2.5cm). I didn't iron the pleats so that they would keep their puff factor. - My measurements were M for bust and waist and L for hips, so I made a first toile in size M, and then adjusted the pattern to get a better fit in the hip and thigh area. I used the amazing and free pants fitting guide from Gina Renee Designs. - I extended the legs by 8 cm (slashed and spread at knee): I'm 1m80. - I lowered the dart apex which landed quite high on me. - I added some seam allowance to the facing and interfacing pieces to get a clean finish: I joined the front and neck facings together, did the same with the interfacing, and then sewed the external edge of the facing to the interfacing right sides together, flipped out and ironed on the interfacing. I think it just looks so much nicer than a serged or zig-zag edge. - I top-stitched the rise and crotch seams after step 22 for extra strength and detailing. - If your fabric is not double sided, make sure you sew the pocket to the main fabric *right* sides together (step 16).
loved to work with this pattern! Had to take out de belly a bit (i've got a little pot belly). Pattern is very detailed and the tutorial is quite clear

Great pattern; pretty true to size..fantastic tutorials.
A beautiful pattern, thank you so much to all the team! I made it with an old bedsheet and I'm super happy with it. I made a little short about it: youtube.com/shorts/4oxpf6wBZPI Here are a few of my tips/notes: • I self-drafted my own pleated sleeves instead of using the pattern's sleeve bands: I drew a simple sleeve pattern, then cut and spread it to create one box pleat in the center and two knife pleats on either side (depth: 2.5cm). I didn't iron the pleats so that they would keep their puff factor. • My measurements were M for bust and waist and L for hips, so I made a first toile in size M, and then adjusted the pattern to get a better fit in the hip and thigh area. I used the amazing and free pants fitting guide from Gina Renee Designs. • I extended the legs by 8 cm (slashed and spread at knee): I'm 1m80. • I lowered the dart apex which landed quite high on me. • I added some seam allowance to the facing and interfacing pieces to get a clean finish: I joined the front and neck facings together, did the same with the interfacing, and then sewed the external edge of the facing to the interfacing right sides together, flipped out and ironed on the interfacing. I think it just looks so much nicer than a serged or zig-zag edge. • I top-stitched the rise and crotch seams after step 22 for extra strength and detailing. • If your fabric is not double sided, make sure you sew the pocket to the main fabric *right* sides together (step 16).

Made this jumpsuit out of a seersucker fabric and loved every step of it! I made only 4 buttons beceause I wanted the collar open.

I made this jumpsuit into a two piece set, so I could wear it also separately.
Toiled this pattern using a pair of vintage cotton curtains before using linen and I actually love the toile more than I thought I would! Pattern is clear and easy, I used a shorter zip than suggested. Love it, thank you!

Made it with a stretch jeans
CUSTOMER CARE


PHONE
1-866-620-2008
Call us Monday through Friday 10 am - 6 pm PST
SHIPPING & RETURNS
- Fast Shipping: 3–8 business days
- Rush Shipping: 2–3 business days
HOW DOES FREE SHIPPING WORK?
Take advantage of our Free Shipping offer on orders shipping within the contiguous US.
Every day on orders of $300.00 or more - we will pay for your shipping.
Your order will be shipped Standard Shipping (4-8 Business Days) with the shipper of our choice. No
international orders.
Standard shipping takes 24-48 hours for processing. Delivery times begin one business day after the
order is placed. This is due to your order being manually cut and packaged to ensure quality.
SKILL LEVELS EXPLAINED
Beginner: A beginner sewist is someone who is new to sewing and has limited experience using a sewing machine or hand sewing techniques. They are ready to follow basic patterns and sew simple projects, but may struggle with more complex designs.
Intermediate: An intermediate sewist has some experience with sewing and can tackle more challenging projects, such as making clothing with more intricate details or using more advanced techniques including sewing invisible zippers or sewing a partial placket. They likely have a good understanding of pattern making, fabric selection, and sewing machine maintenance.
Advanced: An advanced sewist is someone who has years of experience and can tackle complex projects, including custom designs or alterations. They have a good understanding of fabrics, garment construction, and tailoring. They may also have advanced skills in pattern drafting, draping, and couture sewing techniques.
Skill Levels Info
Beginner - Can sew simple straight & curved seams, some topstitching. Includes crafty-type projects and garments that do not require complex sewing techniques or closures.
Confident Beginner - Has sewn a few simple projects and is ready to learn more. Includes techniques such as set-in sleeves, inseam pockets, patch pockets, generous topstitching.
Advanced Beginner - Eager to continue building skills with new techniques such as zippers, buttons & buttonholes, tailored collars & cuffs.
Intermediate - Comfortable with projects that include multiple techniques such as pleating, yokes, fly zipper, slant pockets, and tailored waistband.
Advanced - Confident with complex, multi-step construction such as welt pockets and unusual details. Enjoys the challenge of new techniques and designer quality.